How to add a Sitemap to Google Search Console
Adding your sitemap to Google Search Console is a great way to improve your website’s visibility in search results.
When you submit your sitemap to Google Search Console, Google will crawl your site more frequently and index your pages more quickly.
Adding your sitemap can lead to your pages appearing higher in search results, increasing website traffic.
This article will show you how to add your sitemap to Google Search Console. We will also provide some tips for creating a well-optimized sitemap.
Table of contents
Requirements
Here are some of the requirements you need to add your sitemap to the search console.
- A Website Connected to the Google search console: You need to connect your website to the search console. If you still need to do this, check out our tutorial on connecting your site to the search console.
- Yoast SEO plugin: You should have the Yoast plugin installed and activated on your WordPress website. This plugin will generate your sitemap file, as we shall see later in this article.
Video: How to add your Sitemap to Google Search Console.
Check out the full video on How to add your Site to Google Search Console.
What is a sitemap?
A sitemap is a file that lists all of the pages on your website. It helps search engines find and index your pages more quickly and easily.
When a search engine crawls your website, it will look for your sitemap. If it finds your sitemap, it will use the information in the sitemap to crawl your website more efficiently.
Why should I add my sitemap to Google Search Console?
There are several benefits to adding your sitemap to Google Search Console. These benefits include:
Increased visibility in search results: When you add your sitemap to Google Search Console, Google will crawl your site more frequently and index your pages more quickly. This process can lead to your pages appearing higher in search results.
Improved indexing: Google will use the information in your sitemap to index your pages more accurately. This can help ensure your pages are indexed correctly and appear in search results for the right keywords.
Early detection of errors: If there are any errors with your website, Google can detect them more quickly if you submit your sitemap to Google Search Console. This will allow you to fix the errors quickly and prevent them from affecting your website’s visibility in search results.
How to add my sitemap to Google Search Console
Adding your sitemap to Google Search Console is a simple process. It involves two main procedures. You have to;
- Get the link to the XML Sitemap.
- Add the link to the Google Search console.
Get the sitemap link.
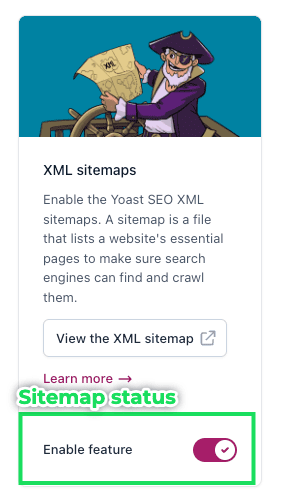
- Go to Yoast settings.

- Navigate to the XML Sitemap feature

- Check the sitemap status.
By default, Yoast turns on the sitemap. If you find it deactivated, turn it on.
- Click to view the sitemap.
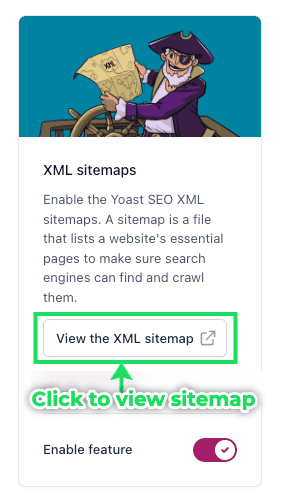
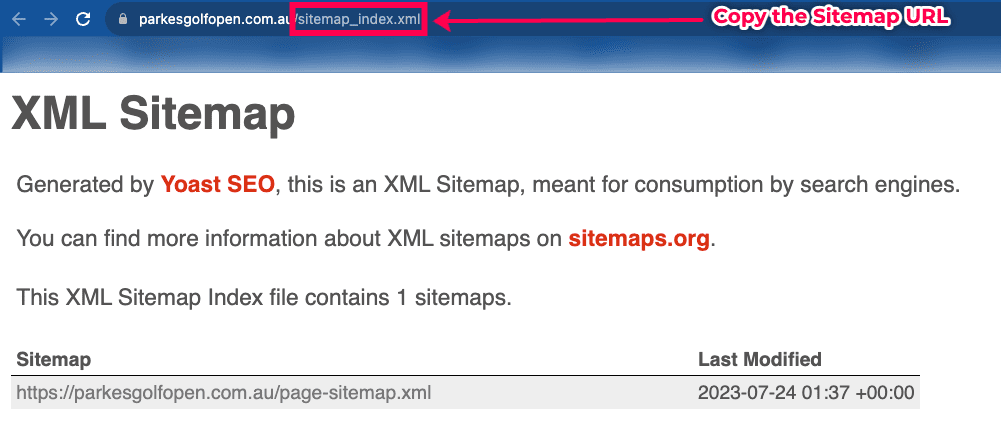
- Sitemap opens in a new tab.
We can now see our sitemap in the browser and its URL. Keep the browser window open. We will switch back to it later.
Submit the sitemap link to the Google Search console.
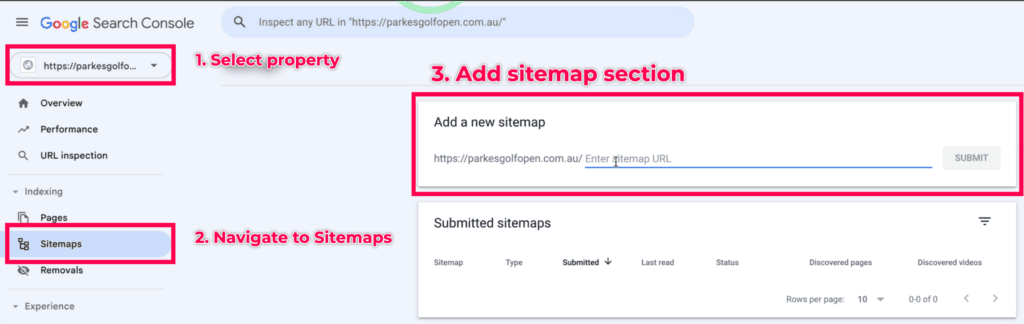
To add our site map, log into your Google Search Console account and follow the steps below.
- Select the property whose sitemap you want to add.
- Click on the Sitemaps tab.
- You will see the section where to submit your sitemap.
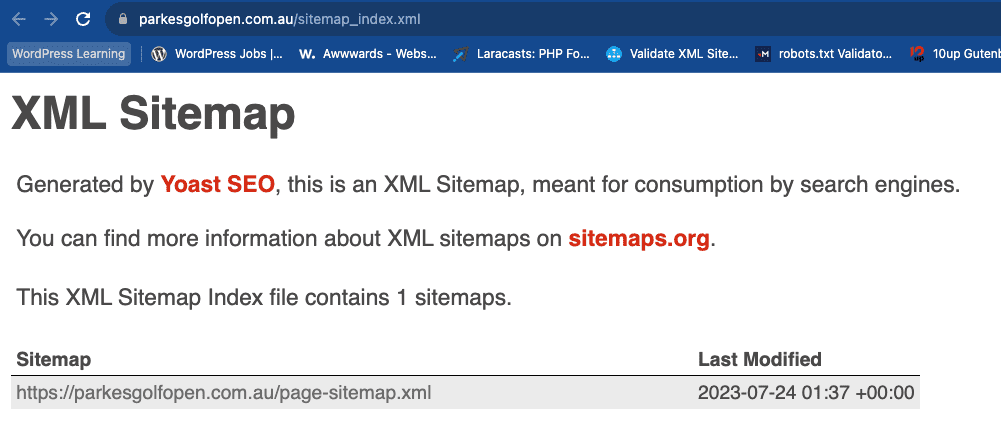
- Return to the tab where we opened the sitemap. Copy the sitemap path without including the domain.
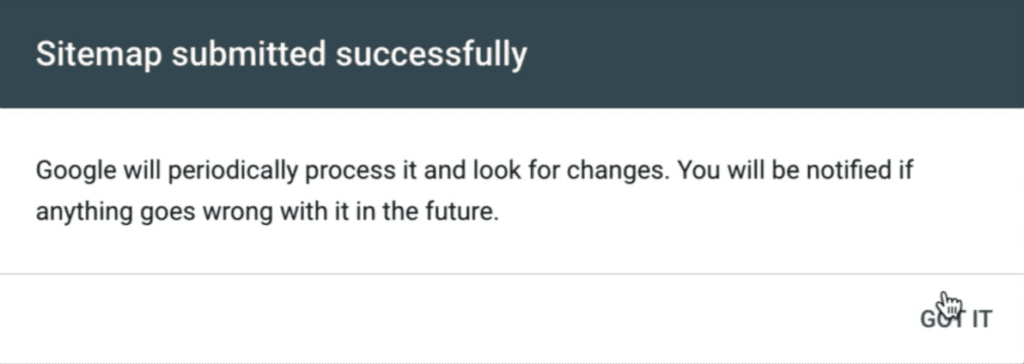
- Return to the search console and paste the URL of your sitemap. Submit the sitemap as shown below.

- Once you have submitted your sitemap, Google will crawl it and index your pages. This process may take a few days.
How to control indexability for your site content
Yoast SEO allows you to control the indexability of your site content. This means you can choose which pages and posts appear in search engine results pages (SERPs).
What is indexability?
Indexability refers to whether or not a page/content on your site is included in search engine results pages (SERPs). If a page is indexed, it means that it is eligible to appear in SERPs when someone searches for a relevant keyword or phrase.
How to control indexability with Yoast SEO
Follow these steps to turn indexing on or off for your content.
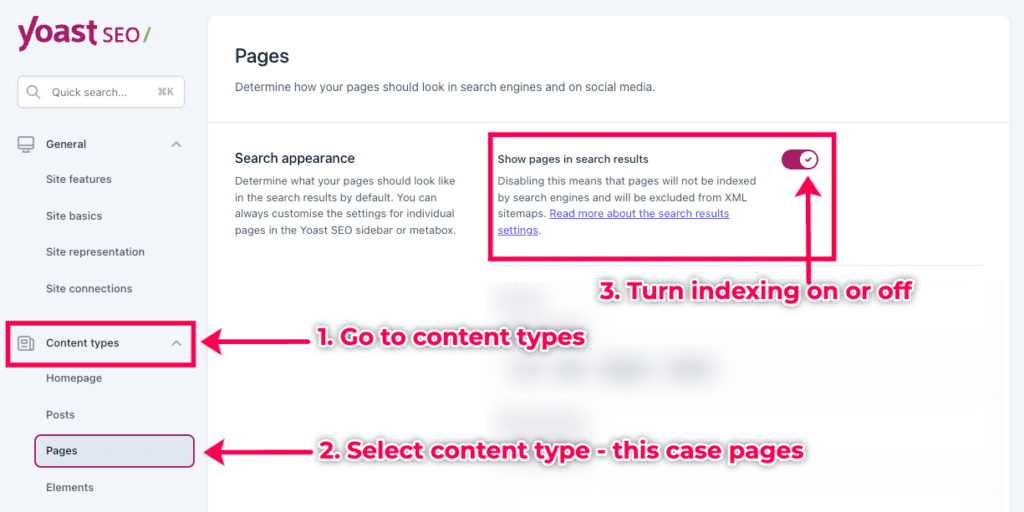
- Inside Yoast settings, go to Content Types.
- Select the type of content whose indexing you want to control. It could be posts, pages or your custom post types.
- Turn on/off the Search appearance switch depending on whether you want the content indexed.
In this article, we have seen that our sitemap only has links to site pages. No other content, such as posts, is listed in our sitemap. This implies that Google will only index the pages within our sitemap.
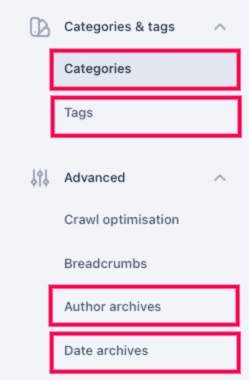
With Yoast, you can further control the indexability for categories, tags, date and author archives. As we have seen, navigate to their settings and turn the Search appearance switch on or off.
Conclusion
Adding your sitemap to Google Search Console is a simple way to improve your website’s visibility in search results. Following this article’s steps, you can add your sitemap to the search console and help your website rank higher in search results.
Extra tips
Check out more tips that can improve your WordPress website’s SEO.