Image SEO best practices in WordPress
Think optimizing your website only involves keyword-stuffed paragraphs and meta descriptions? Think again! Images, often an overlooked gem in the SEO world, can unlock hidden traffic potential for your website. In fact, studies show that 32% of Google searches lead to image results. So, are your website’s visuals working for you or silently sabotaging your online presence?
Table of contents
In this article, we look at the world of Image SEO. Firstly, we look at the benefits of Image SEO. Thereafter, we identify key areas of optimisation to get the right traffic to your website, including;
- Optimising images for performance: Choosing the right image format, resizing images on your site and compressing them before uploading them to your website.
- Optimising images for search engines: Helping search engines gain more understanding of images on your website by naming images correctly and adding alt text to them.
- Extra tips: Using other tools and techniques like CDN, caching pages and using lazy loading to boost page load speeds.
The Benefits of Image SEO
Here are some of the benefits of investing in image SEO:
- Higher Rankings in Image Searches: Image SEO can help you rank higher in Google Image search queries if implemented well. Also, it will give you an advantage over competitors who don’t use image SEO practices.
- Improved Organic Traffic: Higher visibility in image searches can increase organic traffic to your website, contributing to your site’s overall success.
- Enhanced User Experience & Content Value: Well-optimized images load quickly, reducing frustration and keeping users engaged. At the same time, just like you have observed across social media platforms, images enrich your site content when placed appropriately, making it easier to read and digest.
Now that we have seen the power of Image SEO let’s dive into some practical steps to unlock its potential on your website!
Optimising Images for Performance
To boost your Image SEO, you must ensure your images are technically optimised for a smooth user experience. This involves three key aspects:
- Choosing the Right Image Format
- Image Size/Dimensions
- Image compression
1. Choosing the Right Image Format
Selecting the right image format depends on what you want your image to do. The most common image formats on the web are JPEG, PNG, SVGand GIF.
Each format has its strengths and weaknesses, so choose the one that best fits your needs based on these tips:
JPEG: JPEG is preferable for photos, as it can maintain small file sizes. You can use it for large images like banner ads and illustrations.
PNG: This format is suitable for images with a transparent background. It is also ideal for loading images with text, such as screenshots. You can also consider the PNG file format if a picture contains intricate details, such as web graphics, and if the image file size is not an issue.
GIF: This is a good choice for animations and low-resolution video clips.
SVG: SVG is suitable for displaying logos and icons. This is because you can scale images to any size without losing quality. Besides, it is compatible with CSS styling. The downside is that, by default, WordPress does not support this format.
WebP: This image format developed by Google uses lossy and lossless compression formats. It IS ideal for creating high-quality photos in small file sizes. However, some browsers are yet to offer support for this image format.
2. Image Size/Dimensions
After choosing the right image format, you need to resize the images with the correct dimensions for your site page layout.
When discussing image size, we refer to an image’s dimensions (width and length) measured in pixels.
Image sizes are significant because they impact the file size of your images. Image size directly impacts file size: larger images mean more data and more data means a bigger file.
Images taken with digital cameras and phones come in dimensions beyond what the browser can load. Therefore, you should also ensure that your images are the right size before uploading them to your website.
For instance, the best size for a WordPress featured image in WordPress is 1200 x 628 pixels. Thus, uploading an image with dimensions of 2240 x 1260 pixels to a post means you are using larger images compared to what is required.
If resized, you will end up with a smaller and lighter image, enabling your page to load faster.
WordPress Image Sizes for SEO
Here is a guide on the best image sizes for SEO in WordPress.
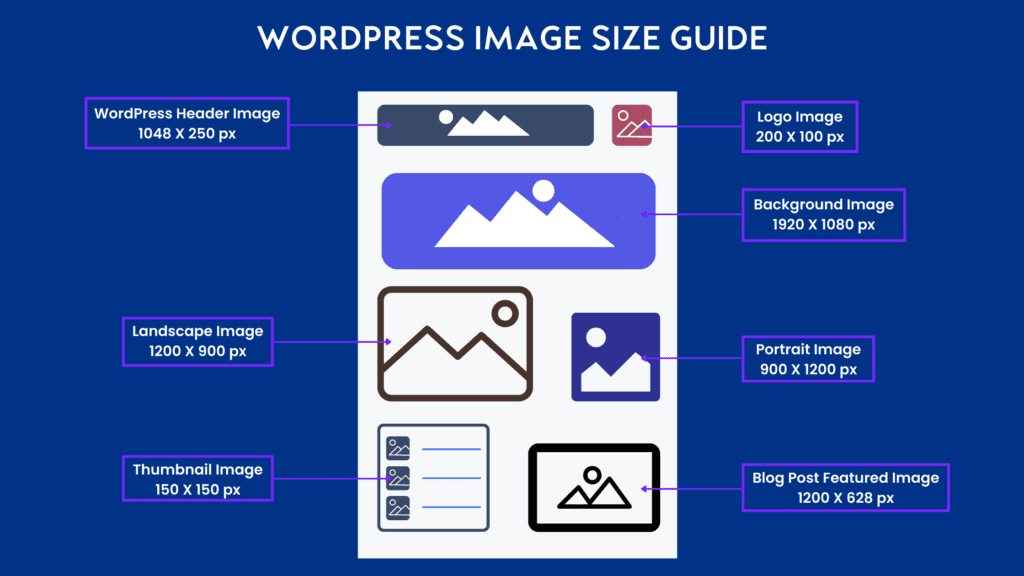
Image Aspect Ratio
When resizing your images, you should also consider using the right aspect ratio.
An aspect ratio describes the width of an image compared with its height. It appears in the form of W:H.
Before uploading your image, it should fit within one of the recommended aspect ratio categories below;
Landscape images (2:1): Landscape images have a width bigger than the height. For instance, a landscape image with an aspect ratio of 2:1 implies that its width is twice as big as its height. These images are best for WordPress headers, blog posts, and background images on social media platforms.
Portrait images (1:2): Portrait images come with a height greater than the width. These images can have an aspect ratio such as 1:2, which denotes the height is two times the size of the width. This aspect ratio is the ideal size for a featured image.
Square images (1:1): Square images can have an aspect ratio 1:1. The width and height are equal. Thumbnails are an example of square images in WordPress.
Image Responsiveness
Responsive images are images that adjust to fit the size of the screen. They automatically resize to fit any screen, whether it’s a tiny phone or a huge monitor,
With WordPress, you do not have to worry about resizing your images for the different screen size options; it is all taken care of in the background when you upload a photo.
WordPress generates three copies of any uploaded image with the following dimensions
- Thumbnail size (150×150 pixels)
- Medium size (300×300 pixels)
- Large size (1024×1024 pixels)
One of the above image sizes loads on your website depending device’s screen size.
You can customize WordPress default image dimensions for responsiveness by adding your preferred dimensions inside the functions.php file.
3. Image compression
We have covered picking the right image and sizing it well. But what if it’s still too big file-wise?
You have to look into compressing your images to optimize load times.
When doing image compression, use techniques to reduce file size without sacrificing image quality.
You can use various tools to compress images before uploading them to your site.
On the other hand, you can upload your images and delegate the task for compression to a plugin.
Image Compression WordPress Plugins
Here are some WordPress plugins that can take care of image compression on your site.

WP Smush: The WP Smush plugin compresses images, resizes, reformats images, and enables the lazy load option. It comes in both free and pro versions.

WP Compress: WP Compress optimizes your images on your site to shrink file sizes. The plugin offers three types of compression: Lossless, Intelligence, and Ultra.

EWWW Image Optimizer: It compresses both new and existing images. This plugin scales images and provides lazy loading and pixel compression options. The EWWW plugin allows you to use modern formats like WebP for tremendous speed gains.
Choosing the right image format, resizing images appropriately, and compressing them – that’s the first step towards boosting your Image SEO.
The next chapter of this article will now focus on assisting search engines in interpreting our images.
Optimising Images for Search Engines
Sure, search engines have gotten pretty good at understanding images using AI. But when it comes to truly knowing what your images are about, they still need a little nudge from you.
With some simple steps, you can provide context and information about your images to help search engines index them more accurately. These steps include;
- Naming images correctly
- Adding alt Text to Images
- Using an Image Sitemap
Use original and relevant Images.
Google recommends that you use original high-quality images on your website, which should be relevant to the content you put on your website.
For example, if you are running a travel booking website, you should upload original images of your travel destinations taken by your camera.
1. Naming images correctly
Naming your images for SEO is very crucial. A filename gives Google clues about the image’s subject matter.
A poorly named picture will not provide enough context for what the image is about.
But with a proper file name, it is easier for search engines to find your images and display them as relevant results.
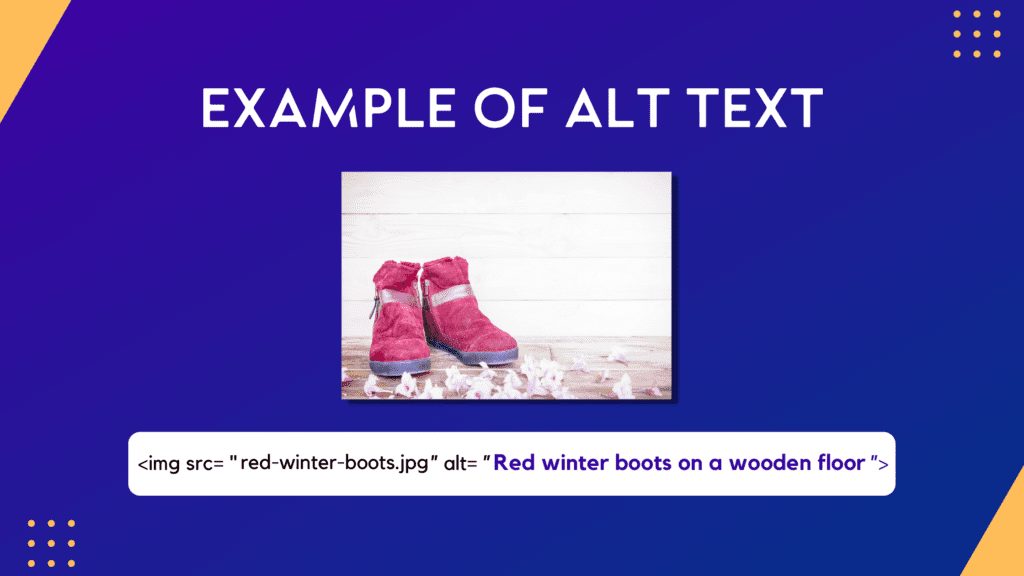
Whenever you export or download an image from a device, it comes with a generic file name like “dsc00001.jpg“. This filename is usually set by the device or camera used.
Unfortunately, this isn’t a proper file name, as it provides no hint about the contents of the image.
A name like “red-winter-boots.jpg” is better than “dsc00001.jpg”; it immediately tells search engines about the image’s subject matter.

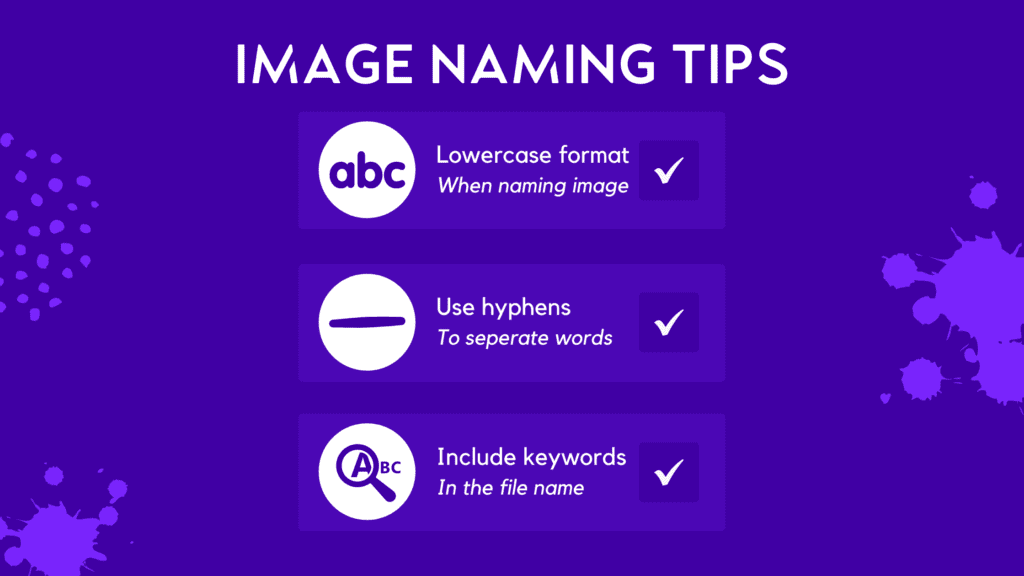
Guidelines on naming images
- Separate the words in the filename with a hyphen (-) or dash and not underscores (_).
- Keep all the letters in the file name in lowercase format.
- Include relevant keywords. If someone searches for a smartphone on a search engine, they are likely to type in the term “phone.” This will be in addition to the brand name of the phone model. A good image name example for this case could be “samsung-s21-phone.jpg“.
- You should avoid keyword stuffing when making your images; search engines can flag this as spam.
Pro Tip
When renaming images, focus on your most important keywords.
2. Adding alt Text to Images
One common mistake people make with image SEO is not adding alt text to images. However, adding alt text is an essential part of search engine optimization.
Alt-text is also known as alternative text. It is a brief description of an image that tells search engines and visitors what it is about
Its primary purpose is to help blind or visually impaired people who use screen readers understand what an image is about.
Alt text also appears in the place of an image on a webpage in case the image fails to load. Hence, defining alt text for each image you post is quite important.
In addition, your photos’ alt text and title tags should always include relevant keywords.
Why Alt Text is Important for Image SEO
First of all, alt tags help Google and other search engines determine the content of your images.
SEO best practices dictate that you must include alternative text for every image on your website. It helps communicate the message you want to convey about a specific image.
Here is an example of an image’s HTML line of code with an alt Text:
Alt text also improves image SEO by allowing you to maximize your use of keywords. This lets internet users find your website when searching for image-specific terms or phrases.
When adding the alt text, you don’t want to overwhelm users with too much information, nor do you want to sacrifice keyword optimization. Aim for around 125 characters or less.
Caution
Including keywords in your alt text is one part of optimizing your images for SEO.
As you did for image file names, don’t overstuff keywords in your alt text. Search engines see it as spam! Instead, describe the image clearly and naturally, using relevant keywords where they fit.
How to Set Alt Text in WordPress
There are various ways how to add alt text to images in WordPress. This depends on the editor or page builder on a site.
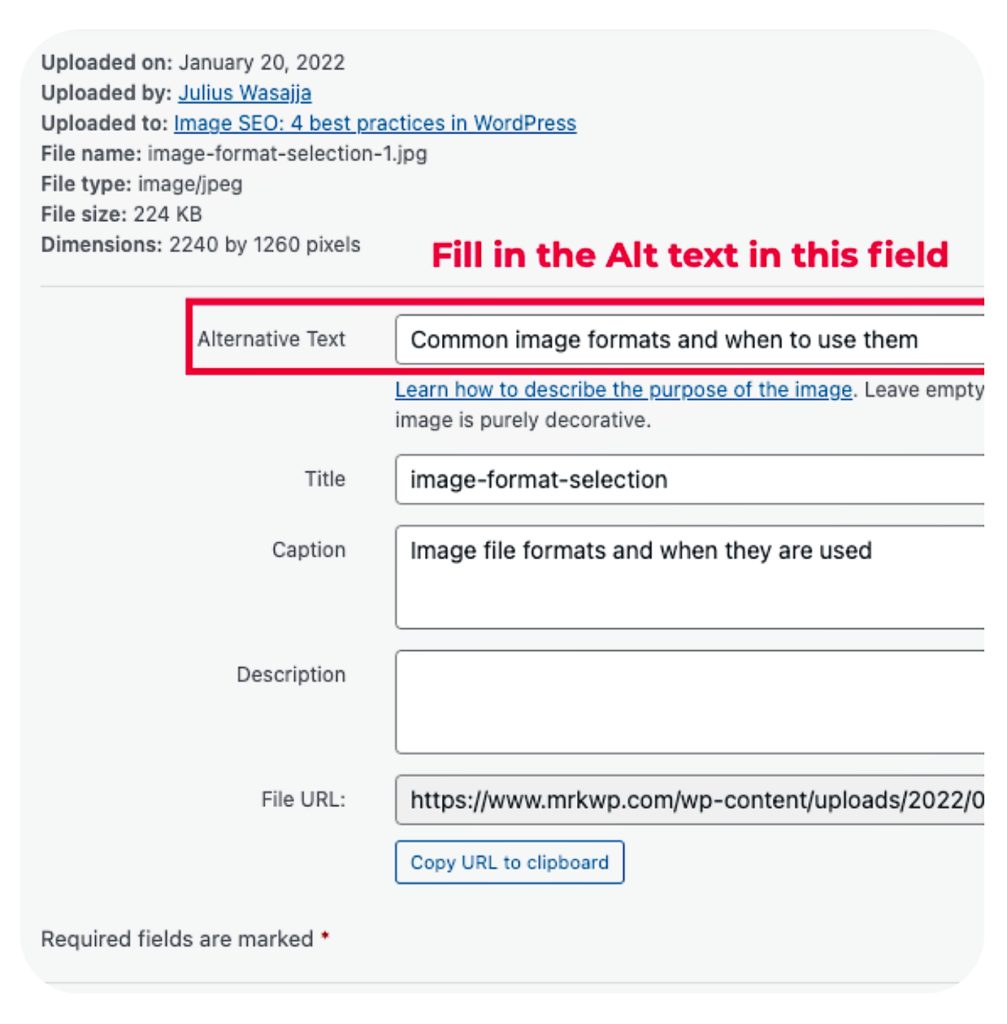
In this article, we will only look at how to add the alt text from inside the media library to ensure it is automatically applied wherever the image is used on your website.
To add alt text to your images in the media library,
- In the WordPress Admin Dashboard, go to “Media”.
- Click on the “Add New” button.
- Upload the image to WordPress.
- When the upload is complete, click on the uploaded image.
- This will open the Image/Attachment details dialog box.
- Add alt text in the “Alternative Text” text area/field as shown below.
3. Using an Image Sitemap
An XML sitemap is a file that provides information about the relevant pages, posts, videos, and other files on your site. An image sitemap includes information exclusive to image files on your website.
An image sitemap is a great way to ensure that Google can find all of the images on your website. It also enables you to inform search engines about which images you wish to be indexed and those to be left out.
Suppose you are using an SEO plugin such as Yoast and Rank Maths. In that case, they create XML site maps for your posts and pages, which include your images in the sitemap.
It is also encouraged to create a dedicated sitemap for your images. This caters to cases where you need to have images hosted on CDN indexed by search engines. This is a feature that SEO plugin-generated sitemaps do not cater to.
Image Sitemaps with Yoast SEO
Yoast’s SEO WordPress plugin makes creating and submitting an image sitemap to Google easy. As mentioned, this plugin adds all the images in your posts and pages sitemap. So you don’t have to worry about adding them yourself.
Setting up image sitemaps with Yoast SEO is a breeze. Here are simple steps you can follow to set up image sitemaps.
- Go to your dashboard.
- Click on the “SEO” tab.
- Then, select the “XML Sitemaps” sub-tab. You can activate XML sitemaps for images from there by checking the corresponding box.
The Yoast plugin provides more options to extend the functionality of the XML site map feature. Check out more information regarding Yoast SEO image sitemaps here.
Apart from Yoast’s SEO plugin, you can use several other plugins, such as Simple Image XML Sitemap, to create image sitemaps.
Extra tips
Beyond choosing the right formats and compressing your images on your site, explore these additional hacks to optimize their performance further and boost your image SEO in WordPress:
1. Speed Up Delivery with a CDN
Content Delivery Network (CDN) is a global network of servers that delivers your web pages faster to your visitors.
Consider services like Cloudflare, which helps build scalable image deliveries, ensuring quick and secure loading on the CDN.
2. Cache Those Frequently Visited Pages
Caching creates pre-loaded snapshots of your popular pages. This means visitors can access them instantly, resulting in a smoother browsing experience.
You can explore various caching tools like WP Rocket to make your key pages easily accessible.
3. Let Images Load On-Demand with Lazy Loading
Configure your website images only when needed. Avoid unnecessary page weight and boost your page load times.
Explore caching plugins like WP Rocket that can implement lazy loading on your website
Final Thoughts
Image search optimization ensures that web users find your images online. It is a great way to ensure Google Image Search and other image-crawling bots find your website.
Always make use of all these best practices for your images. Ensure to use high-quality and useful images that complement your content. This helps readers better understand the subject and will lead to better engagement and conversions.
Implementing these tips will boost ranking in Google Image Search queries and drive even more traffic back to your site. Use these best practices today to increase image SEO for better results and stand out from the competition.
Access the infographic on the four image SEO practices in WordPress here.
Image search engine optimization (SEO) refers to optimizing images on your site so that search engines can find and understand them.
The process of image SEO involves practices like using appropriate images (format and size), light images, correct file names and adding alt text to images.
Any website that uses images to improve the user experience and boost sales. Websites like eCommerce sites and blogs need image SEO.
Yes, Google will read the alt text on images, contributing to how Google lists your website in search results.
Having an image title doesn’t have many benefits for image SEO. Just focus on adding alt text for all your images.
Many plugins can help with optimizing images. Some WordPress plugins you can rely on include Real Media Library, ImageSEO, Open Graph WordPress plugin, and Imagify.