How to add a Facebook Pixel with Blocksy Pro
Enabling Facebook pixel code placement with your website can be tricky. But in this tutorial, we will show you how to add the Facebook pixel to your website with Blocksy Pro. With the Blocksy theme, the entire process is a breeze.
Every website owner would like to be aware of every activity on their site. That is where the Facebook pixel comes in. In simple terms, it is a snippet code that lets you track conversions, events, and other actions that bring sales to your website.
The Facebook pixel code then lets you view these actions on your Facebook pixel page in ‘Events Manager’.
Above all, this code embedded in your website can collect data from Facebook Ad Campaigns. This can improve and tweak your campaign.
Note: A Facebook pixel is now called a ‘Meta pixel ‘as part of the Facebook Rebrand.
Requirements: To add the Facebook Pixel code to your site, you need to activate the custom code snippet extension. This is possible with the Blocksy Pro version, which you can purchase here.
Video Tutorial
Here is my YouTube video tutorial on adding a Facebook pixel with Blocksy Pro.
Rule of thumb: Always backup your website before making changes to it. This enables you to restore your site with a previously working backup version if the changes do not go as planned.
1. Activate Custom Code Snippet Extension
The first thing you need to do in this process is activate the Custom Code Snippets extension in Blocksy Pro. To do this, follow these steps:
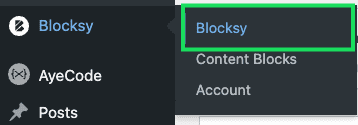
First, navigate to the ‘WordPress Dashboard‘.
Then, click on the Blocksy icon among the menu items on the dashboard.
Then click on ‘Extensions‘, which is among the options. Under ‘Extensions‘, click on ‘Pro Extensions‘.
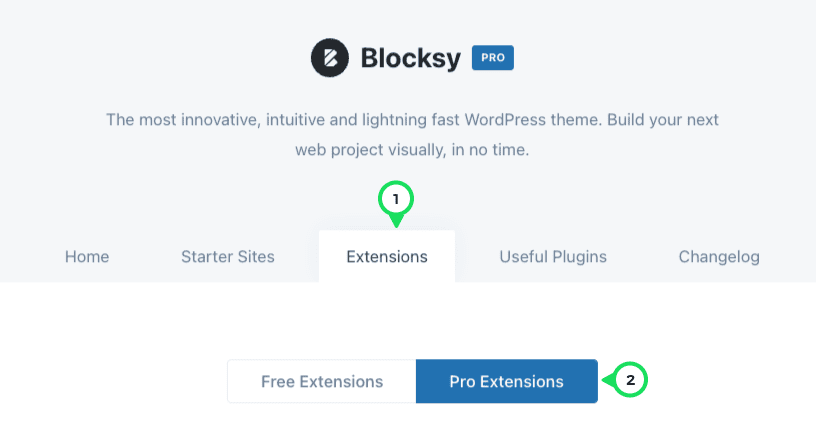
Afterward, look for ‘Custom code snippets‘ and click “activate.”
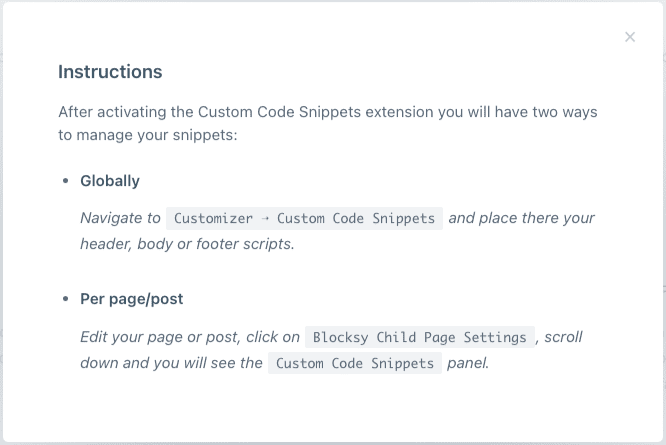
If you need more information on how to use the extension you have just activated, click on the information symbol on the right side of the activation button. The instructions will be displayed.
2. Add Facebook Pixel Code
Now that we have Custom Code Snippet activated in Blocksy Pro, we can go ahead and add the Facebook pixel. Follow the steps below;
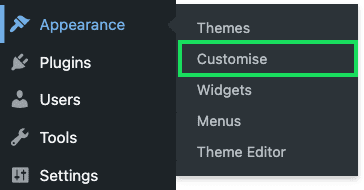
Return to the WordPress menu and go to ‘Appearance‘ among the menu items.
Under ‘Appearance‘, choose ‘Customise‘. That will take us to the customization mode of Blocksy Pro.
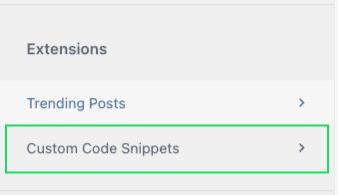
Then, scroll down the left sidebar until you reach the ‘Extensions’ section. While here, click on ‘Custom code snippets.‘
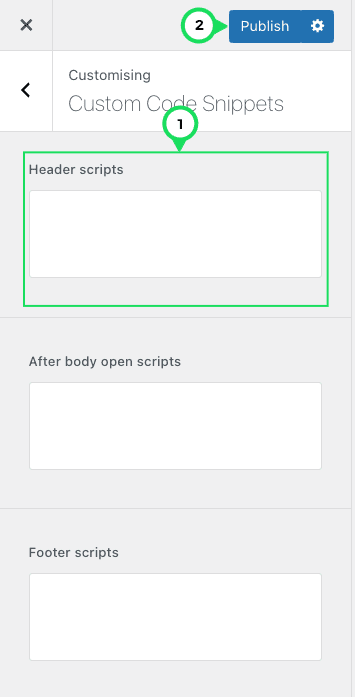
The Custom Code Snippet offers three code placement areas. These are the header, body, and footer scripts.
The Facebook Pixel code applies to the header section as Facebook recommends.
Adding the code to the header section reduces the chances of browsers or third-party code blocking the pixel’s execution. It also executes the code sooner.
– Facebook
It might not be the case if you placed the code in either the body section or footer section.
Once you have placed the code in the ‘header scripts’ section, click ‘Publish‘ to add the Facebook pixel to the website.
We need to clear the cache when we are through with this step.
3. Clear server cache
To clear cache, go back to the ‘Dashboard‘.
Cache means stored web documents such as HTML pages and images stored temporarily—your web browser stores copies of web pages you have recently visited.
Since we host our website on WP Engine, we follow these steps to clear the cache.
Return to the ‘Dashboard‘.
Then go to the ‘WP Engine’ menu item. On the WP Engine page, go to the ‘Caching tab‘.
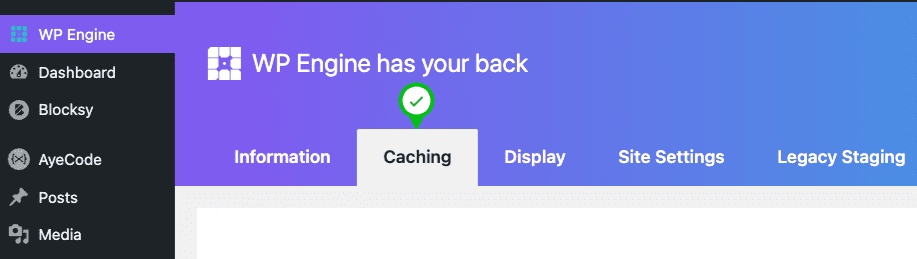
Scroll down and click the ‘Clear all caches’ button to clear the cache. This finally marks the end of our process.

Sometimes, Facebook Pixel might not work even after adding it to your website. This could be because your server is still providing the old cache. So it is essential to make sure that you clear the old cache.
Another essential aspect to note is verifying if the Facebook pixel has been added to your site. You can do this in a few steps with the Facebook Pixel Helper.
Add the Facebook Pixel Helper extension to your Google Chrome browser.
After that, you should visit the page where you have added the Facebook Pixel code.
A popup will indicate how many pixels it finds on the page if the code is added. It will also tell you if your pixel is working correctly and the errors if it fails to work.
Final Thoughts
We hope this tutorial helps you get your Facebook pixel set up on your WordPress website with Blocksy Pro. Blocksy is a powerful WordPress theme that we use here at MRK WP to create and manage our clients’ websites. With the Blocksy Pro version, you have access to different customizable options for your website.