How to Style Gravity Forms with Divi
Want to add a Gravity Forms to your Divi page or design? Styling your Gravity Form can often be a challenge and requires custom css.
Do you want to use the Divi Visual Builder to style Gravity Forms? Now you can with our premium plugin for the Divi and Extra theme from Elegant Themes.
In this quick tutorial, we will show you how to style Gravity Forms with Divi using the Gravity Forms Divi Plugin. We will show you how to use the default settings, and then how to add your unique styles using the Theme Customiser settings in WordPress.
Table of contents
Before You Start
To do this tutorial we expect that you already have WordPress, Divi Theme and Gravity Forms Plugin installed on your website.
Our solution will work with both the Extra Theme and the Divi Theme.
Lets get started so you can enjoy the beauty of Divi and Gravity Forms.
Step 1 – Install our Plugin to Style Your Gravity Form
Before starting to create your form its best to install the Gravity Forms Divi Plugin.
Download the Gravity Forms Divi Plugin here by registering for a free trial.
Now you need to install and activate the Gravity Forms Divi Plugin. (We have a free 7 day trial available so you can give it a try before you commit to purchasing the tool.)
Once the plugin is installed it will ask you to also install the Kirki Customiser Framework. This is required for the style tools to work within the theme customiser. We use Kirki to customise the Theme tools inside WordPress. It saves us a heap of time.
Important Tip: Clear your server cache and your browser cache. This will ensure that the new styles load and match your Divi Styling.
Step 2 – Check your Existing Gravity Forms
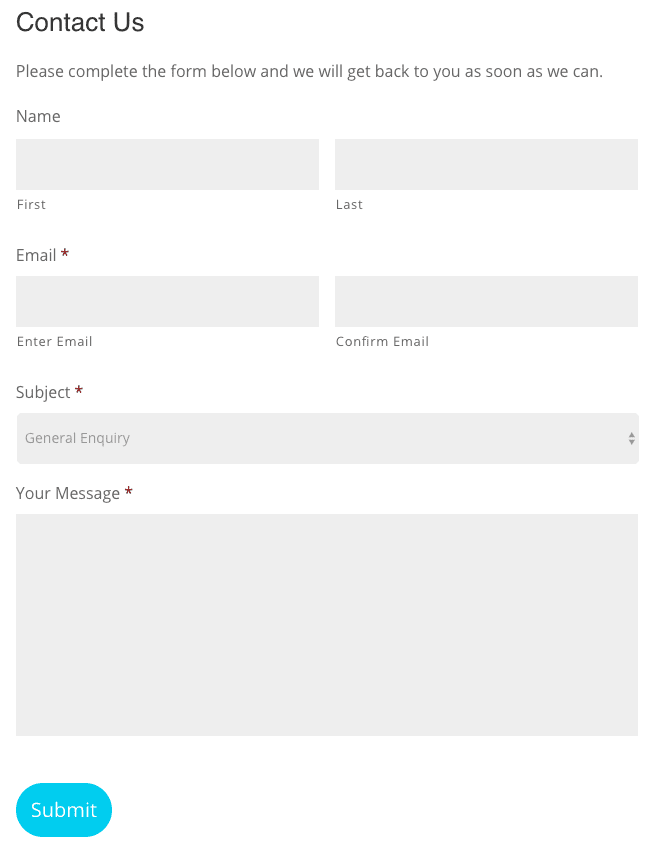
Once the plugin is activated most of your gravity forms will already have a level of styling. Go ahead and check each one. They will look very similar to the Divi Form defaults.
You will see that a load of new styles have been added. The form now looks a whole lot better and much more ‘Divi-like’. Just like the Contact Form example below.
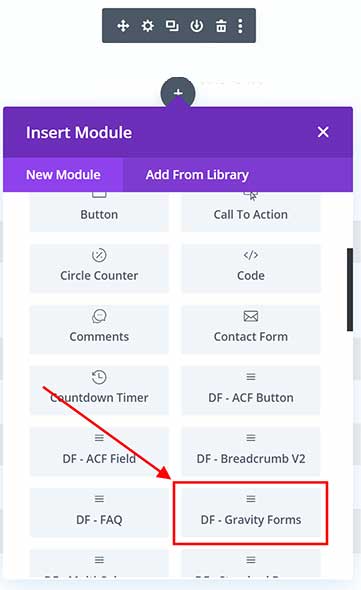
If you are using the front end editor we recommend you remove your short codes and replace the embedded forms using our Divi Module. This will allow you to style your Gravity Form using the frond end editor. It also gives you the most consistent results.
We have global styling available in the plugin too. You can use the Theme customiser to set a global style for all your Gravity Forms. I normally set this up as my first step on a new site. This is so that all my forms look great to start with.
The Global Style also sets the defaults inside the Divi Module for Gravity Forms.
Step 3 – Customise your Gravity Form styles with the Theme Customiser
Go to the WordPress Admin area and go into your Theme Customiser (find it on your WordPress Dashboard by going to Divi > Theme Customiser). Once you are inside the Theme Customiser, find and click on Ultimate Gravity Forms Style. Here you can style all of your form elements. These are global defaults for your forms.

Here you will find the following settings, and remember, these are for every single form on your site:
General – allows you to set a background colour or change the padding.
Title – control the font, size, style, colour and spacing. These are the standard stying features.
Description – this is control over the description text. You can turn that feature on inside your gravity form insert.
Labels – these are the labels over each of your items. Again using the standard styling features in Divi.
Input – control the font, colour, style, line height etc.
Form Button – set your button style, including background colour, hover colour, font, icon, orientation, size, borders etc. All the standard Divi features.
Progress Bar – set the background colour and font colour.
Form Border – if you want a form border, you can set the border style, size and colour.
Error – allows you to customise the error message when it is displayed.
For an up to date list you can check the product page.
Step 4 – Publish and you’re all done!
When you are finished you can click Publish and you’re ready to go!
This means that now whenever you insert a Gravity Form on your website, all of your forms will have the same styles applied. It’s a great result that takes very little time! Now you will be able to focus on building your forms, instead of spending time on styling every time you add a new form. Now that’s a great time saver.
What if your style is not working?
Sometimes this happens because of the Divi Builder CSS. Its very common with the Submit Button. The best way to deal with this is use our Custom Module. This can be accessed from the Page Builder.
The Divi Module for your Gravity Forms works in all forms of the Divi Builder including the visual builder.
What if you want different form styles?
In this case the Divi Module for Gravity Forms is the tool to us. It allows you to style each form as an individual form entry.
That’s a quick introduction to the Gravity Forms Divi Plugin from M R K WP. It’s a premium product so we encourage you to become a Premium Member. We hope you find the plugin useful and that it allows you to start making some beautiful looking Gravity Forms!
If you have any feedback do let us know via the help desk. You can send us an email and we will generally get back to you within a few hours.