3 Easy Methods on How to Create a WooCommerce Sales Page
Does your online store have products on sale that you would like to show on a single sales page? You need a WooCommerce sales page.
Creating an enticing and well-structured on-sales page can make all the difference in selling products that are on sale. This can boost your product’s sales by making the best deals easy to find on your website.
You can set a sale price for some of your products in WooCommerce. These specific products are usually shown on your shop page with a “Sale” badge to separate them from products that are not on sale.
But what if you could create a dedicated sales page that only displays all your products in the store that are on sale? This can be a powerful strategy to attract more customers and increase your sales. It shows the best deals in one easy to find URL.
This article will explain an on-sale page and why you need to create one. We will also show you how to create an on-sale page in WooCommerce in three different ways.
Table of Contents
What is an on-sales page?
An on-sales page in WooCommerce is a dedicated page that displays products under the on-sale promotion.
How To Add a Sale Price to a WooCommerce Product
To put a product on sale inside the WooCommerce;
- Open the product page and go to the General section.
- Add the product’s regular price.
- Set the product’s sale price.
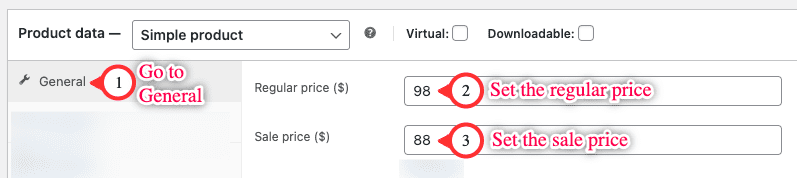
The product will have a “SALE” badge on the shop page to show customers it is on a discount.
Why do you need an on-sales page?
Here are some of the benefits of having an on-sales page in WooCommerce:
- To promote your sales: An on-sales page can help customers find your best deals. Highlighting your discounts on a dedicated page allows customers to easily see and buy the products they want.
- To clear out inventory: Do you need to clear out your inventory and make room for new products? You can place products that are not selling and create a dedicated on-sales page for them. This will attract customers looking for a bargain.
- To boost your brand: A dedicated sales page can help you show customers that you offer good deals. By offering these discounts, you can show your customers that you are committed to providing them with the best possible value.
3 ways of creating an on-sales page
Let us look at the top three methods of how you can create a sales page for your WooCommerce store.
Method 1: Using the Easy Sales Page Plugin
The Easy Sales Page plugin by MRK WP is the easiest method of creating a sales page in WooCommerce.
The Easy Sales Page plugin can help you create the sales page through;
- Filtering the on-sale products on the shop page
- Using the WooSale Dynamic block
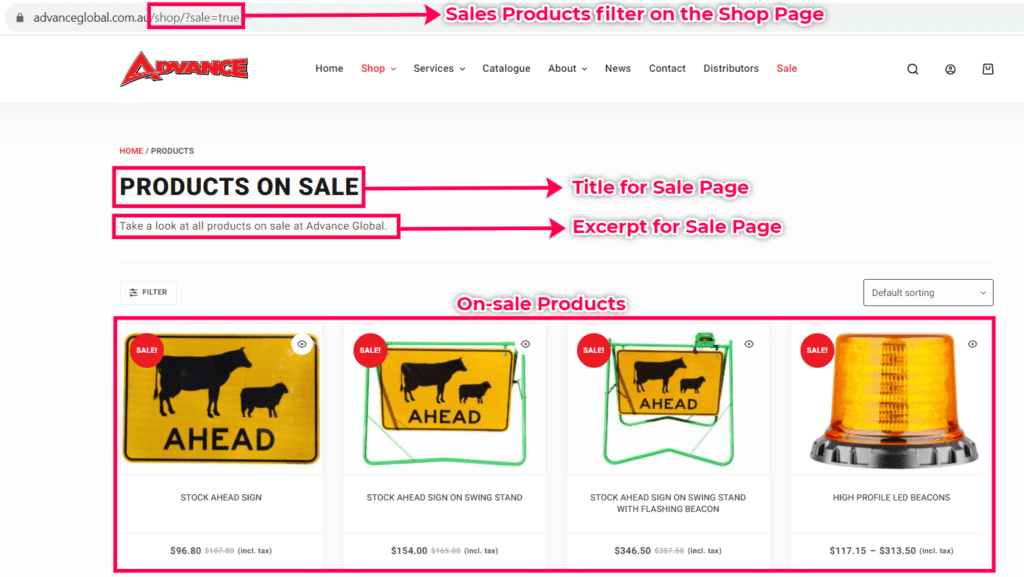
1. Filtering the on-sale products
Our plugin takes on the appearance of your default Woocommerce shop page and applies a filter that returns products in your store that are on sale.
The Easy Sales Page plugin also allows you to set a custom title and excerpt for your sales page.
All you have to do is to install and activate the plugin. The plugin will create the sale page on your WordPress website via this address: /shop/?sale=true.
Check out the video tutorial on How to Set up and Use The Easy Sale Page Plugin.
2. Using the WooSales Dynamic Block
The Easy Sales Page plugin comes with the WooSale Dynamic Block that renders the [sales_products] and blocks.
You can use the WooSale Block to display the on-sale products anywhere on your site.
Watch the video tutorial on How to use the WooSales Block to display on-sale products.
With our plugin, there’s no need to code or style the Sales page separately. Our tool automatically inherits the styles and appearance from your default shop page.
Our plugin is an affordable solution for businesses. You can purchase the Easy Sales Page for as low as $9.50 per site per year.
The plugin also works seamlessly with most classic themes, including popular options like Divi, Elementor, Spectra, Kadence, Astra, and Blocksy.
Pros and Cons
Let us look at some of the Pros and Cons that come with the Easy Sales Page plugin.
| Pros | Cons |
|---|---|
| 1. Very easy to set up and use. | 1. It is not free |
| 2. Uses the same styles and design as your default shop page. No need to customize the code. | |
| 3. Works seamlessly with classic and most popular themes |
Note
Check out the Easy Sales plugin page for more information on creating a sales page for your website.
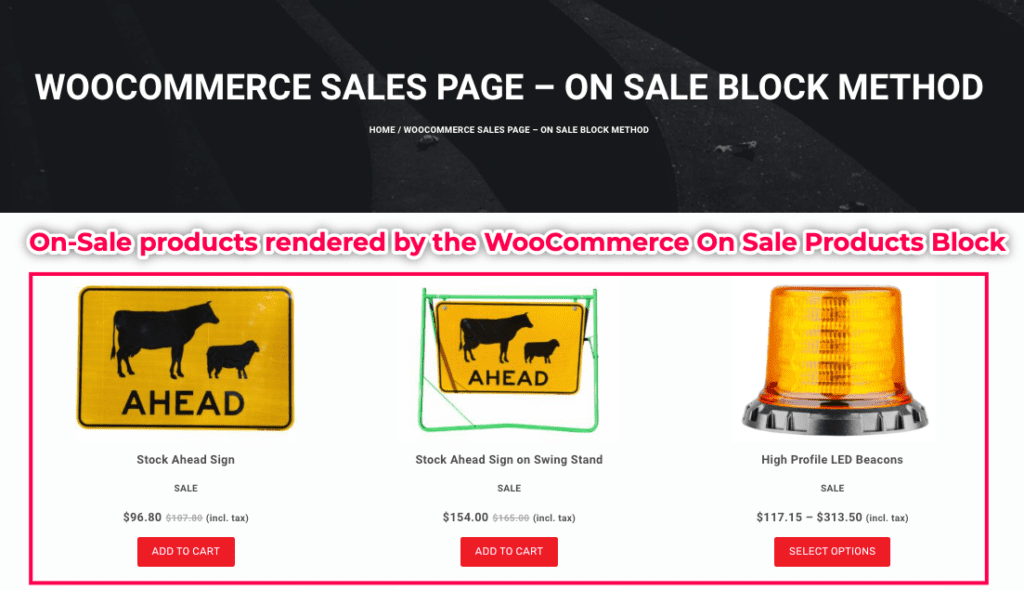
Method 2: Using WooCommerce On Sale Products Block
The second method looks at using WooCommerce’s default On Sale Products Block. This approach applies if you use the Gutenberg block editor to create your website pages.
To use this method;
Step 1: Create a New Page
- In your WordPress dashboard, navigate to “Pages” > “Add New.”
- Give your page a title, like “On Sale Products.”
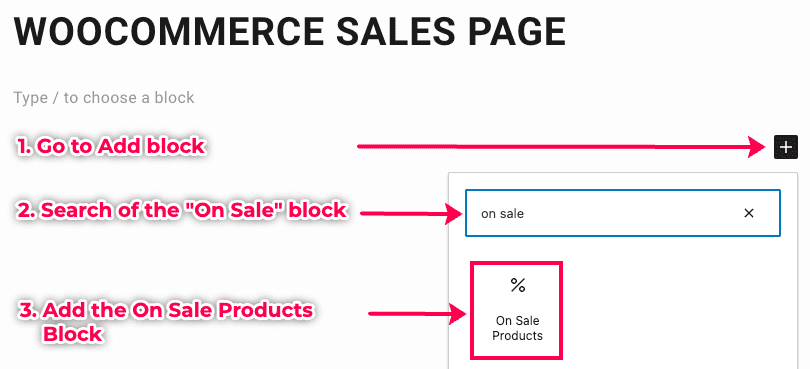
Step 2: Add the On Sale Products Block
- Click the “+” icon to add a block in the block editor.
- Search for the “On Sale Products” block.
- Select the “On Sale Products” block to add it to your page.
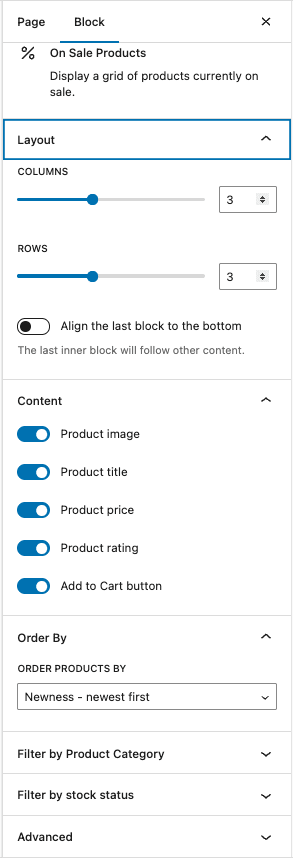
Step 3: Customize the Block
You can customize the block settings, such as the page layout, the order and product attributes to display.
Step 4: Publish Your Page
- Click “Publish” to push your sales page live.
Pros and Cons
Here are some of the Pros and Cons of using the On Sales Products Block.
| Pros | Cons |
|---|---|
| 1. Very easy to set up and use – no code required (unless you need styling to match your site) | 1. Applies completely different page styles that do not match your default shop page styles. |
| 2. It is free | 2. Only works with the Gutenberg block editor |
Note
Here is an extra resource for you to read more about the On Sales Product Block.
Method 3: Using the Sale Product shortcode
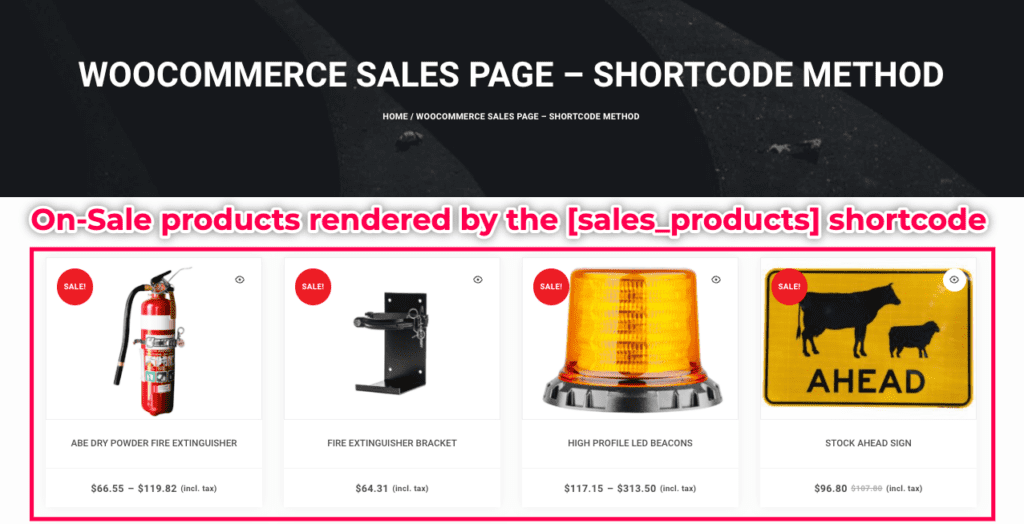
Another way you could build your sales page is by using WooCommerce’s [sale_products] shortcode. This shortcode outputs all products in your store that have a sale price.
To set up your sales page with this method, follow these steps:
Step 1: Create a New Page
- In your WordPress dashboard, navigate to “Pages” > “Add New.”
- Give your page a title, like “Sale Products.”
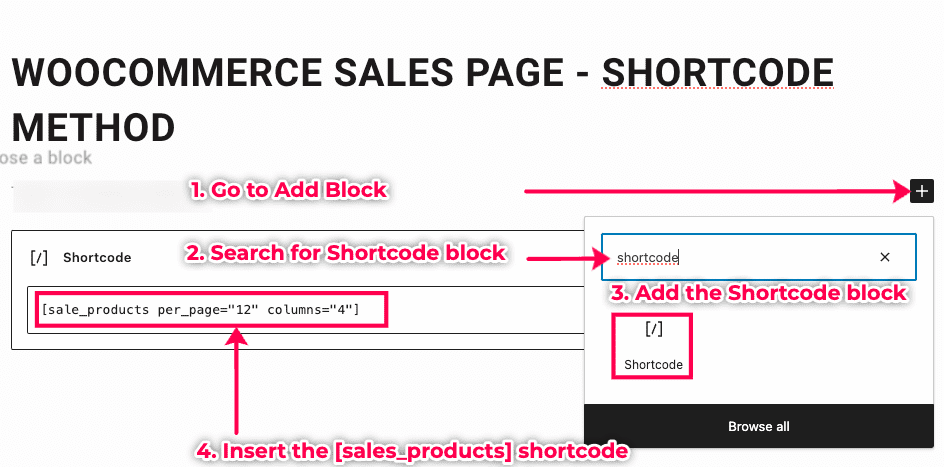
Step 2: Add the sale_products Shortcode
- Click the “+” icon to add a block in the block editor.
- Search for “Shortcode.”
- Select the “Shortcode” block to add it to your page.
- Insert the following shortcode into the block:
[sale_products]
Note
You can use the [sale_products] shortcode without the shortcode block. It works on all page editors and builders.
Step 3: Publish Your Page
- Click “Publish” to make your sales page live.
Step 4: View Your Sales Page
- Visit your sales page to see the list of products on sale.
Pros and Cons
Some Pros and Cons of using the sales_products shortcode method to build a sales page.
| Pros | Cons |
|---|---|
| 1. Compatible with any themes, page editors and page builders. | 1. Require some knowledge on knowing how to use shortcodes and their attributes. |
| 2. It is free | 2. It does not provide a preview of the page content in the page editor. |
Note
Here is an extra resource for you to read more about the sale_products shortcode.
Final thoughts
Creating a sales page in WooCommerce can significantly boost your sales and attract more potential customers to your online store.
As a store owner, you choose to use a dedicated plugin like Easy Sales Page or leverage WooCommerce’s built-in features. The key is to make your sales page visually appealing, user-friendly, and tailored to your target audience.
By implementing any of the 3 methods outlined in this article, you can create an effective on-sale page to increase your sales.