Using Composer and PSR-4
In this guide, we will be adding composer and PSR-4 standards to our block plugin project. Composer and PSR-4 are tools that can help make plugin development easier.
Composer is a dependency management tool. It ensures you install your plugin’s dependencies correctly.
PSR-4 is a standard for organizing PHP code. It can make your plugin’s code more readable and maintainable.
Guide: Buiding a Plugin for WordPress
We have a full guide on building a plugin for WordPress. In this guide, we discuss using Composer and PSR-4 in standard in detail.
Table of contents
Convert plugin to Composer and PSR-4 Tutorial.
Adding Composer to WordPress Plugin
To add Composer to our project, we will do the following.
- Create the composer.json file at the root level of our plugin’s directory.
Note
You should have composer installed via your terminal. If you are using Local WP, this comes with composer pre-installed. If you do not have it, download it from the Composer website.
- Add the following code to composer.json.
Code explanation
From the code above, lines 2-6, we define some fields for the Composer project. These include the name, description, type of project, license and the authors.
From line 12 to line 17, we set the config fields. Set the vendor-dir property to lib.
On line 15, allow other users to use this composer package.
Note
By default, the vendor-lib compiles code to the vendor folder. But, when using WP Engine and some hosting providers, we discovered these files did not work as expected. We, therefore, compile to the lib folder as seen on line 13.
The “require” key, lines 24 – 26, defines your project’s dependencies and their versions.
PSR-4 Autoloader.
We use the autoload field on lines 27-29 to specify the autoloader and our namespace. In this project, we will use the psr-4 autoloader.
Our namespace is a mapping to a folder that will store all our PHP code. In this example, we define our namespace as MRK_Scbdemo and map it to the core folder we will create later.
This setting implies that whenever we define MRK_Scbdemo\\ as our namespace, we are pointing to the core folder inside our project.
MRK_Scbdemo\\ maps to ./core folder.
Note
All our PHP code for our project except the plugin’s main/entry file (scbdemo.php) will be inside the core folder. We will look into this core folder later in this guide.
New File Structure with Composer and PSR-4
Here is the new file structure that we are going to adjust to.
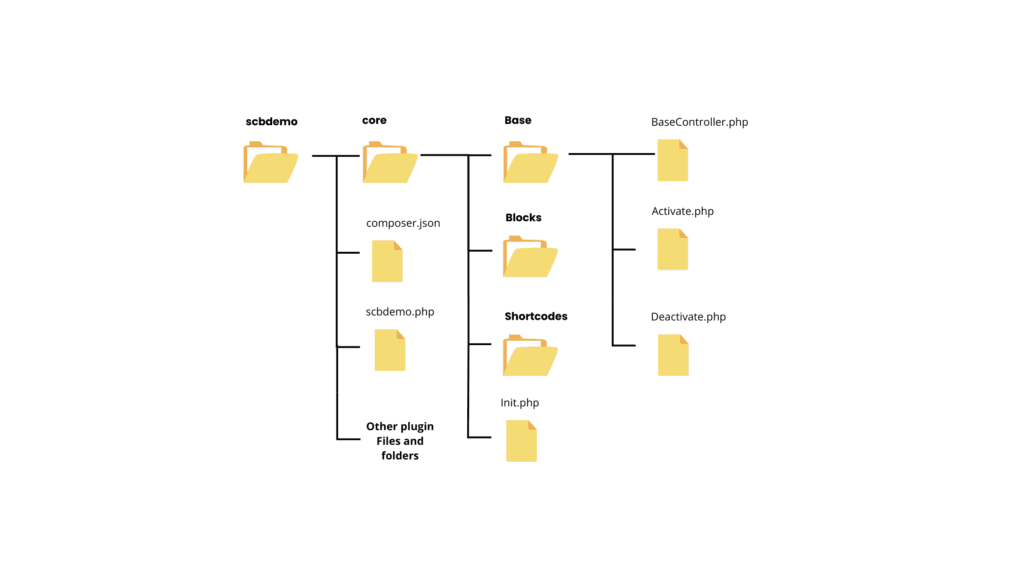
Create the core folder.
We need to create the core folder at the root level of the plugin folder. Inside the core folder, we will create the;
- Base folder: For the Basecontroller, Activate and Deactivate classes.

Note
Check out our guide on building a plugin for WordPress. Here we discuss the classes inside the Base folder.
We explain in detail the Basecontroller, Activate and Deactivate classes. Follow the video tutorial to understand what these classes do inside a plugin.
Note
In scbdemo, our namespace is MRK_Scbdemo\Base across classes inside the Base folder.
- Blocks folder: For all block file classes.
- Shortcodes folder: For all the shortcode file classes.
- Init.php file – We will look into this file in detail later.
Note
We use the PHP code sniffer to implement the WordPress coding standards in our plugin code.
Init Class file – Init.php
Create a final class – Init. We cannot extend this class anywhere in our project.
The Init class handles the initialization of all our classes using three methods.
- get_services()
- register_services()
- Instantiate()
These functions/methods do the following.
get_services method
This class lists our classes and returns them in an array.
register_services method
On line 35, the register_services class runs a for loop through each class returned from get_services.
It instantiates each class by calling the instantiate method, which returns each class instance as a service on line 36.
Line 37 checks if a register method exists inside service ( the instantiated class).
If the register method exists, it calls it on line 38. The register method registers any hooks and filters in our plugin. We will see an example of this at a later stage.
instantiate method
This method instantiates our classes. We call this method inside through the register_services function.
After instantiating a class, it stores the instance of that class as a service on line 52.
Editing the main plugin file – scbdemo.php
Return to scbdemo.php and add a few lines of code.
- Line 17: This prevents direct access to the plugin files.
- Line 19 – 22: Requires the lib folders for the project. We run composer to generate these lib folders. We will see this later.
- Line 24 – 42: Registering activation and deactivation hooks.
- Line 44 – 49: Call the register_services method inside the Init class. This method will load our plugin classes.
Note
You will notice in the video that we have the block’s registration method inside scbdemo.php. We can leave it there for now since this will not cause any issues with the plugin.
Running Composer
Our next step is to run the composer to build the lib folder. To do this;
- Open the terminal at the plugin’s (scbdemo) root directory.
- Run the command
composer install - This installation will create the lib folder containing build files.
Test Plugin – With Composer and PSR-4
Go to plugins inside your WP Admin. You will find the Scbdemo plugin activate and running with no errors.
Note
Install the Query monitor plugin on your demo website. Query monitor can flag any errors with your plugin so that you can fix them.
Test for the scbdemo block to ensure it is still working on our demo page.
Guide recap
In this guide, we have looked at the following;
- Adding Composer to a WordPress plugin.
- Using composer together with PSR-4 autoloader.
- File structure changes to add the core folder and its contents.
- Making changes to the main plugin file (scbdemo.php) to autoload our classes.
- Running composer to generate the lib files and folders.