How to Lockdown WordPress Login Page with Cloudflare
Keeping your WordPress site secure is crucial. A common target for attackers is the login page, specifically /wp-login.php. Fortunately, with Cloudflare, you can add an extra layer of security to lockdown the WordPress login page. Learn how to Lockdown your WordPress login page with Cloudflare.
This article explores how to create a web rule inside Cloudflare to lock down your WordPress login.
Table of Contents
What You Will Need
Before proceeding with this guide, ensure you have the following;
- Domain managed inside Cloudflare: For Cloudflare lockdown to work, your domain’s name servers must be pointing to Cloudflare.
- Admin IP List: Make a note of the IP addresses allowed to access the login page (usually yours or your office IPs).
Tutorial: How to Lockdown Your WordPress Login with Cloudflare
Watch the video tutorial on how to protect your WordPress Login with Cloudflare.
Steps on How to Lockdown WordPress Login Cloudflare
Follow the steps below to block your WordPress login page (/wp-login.php).
Access the Website inside Cloudflare
- Log in to your Cloudflare Dashboard: Visit Cloudflare and sign in to your account.
- Select Your Website: From the Website view, select the site whose login page you want to protect.
Create the Firewall Rule
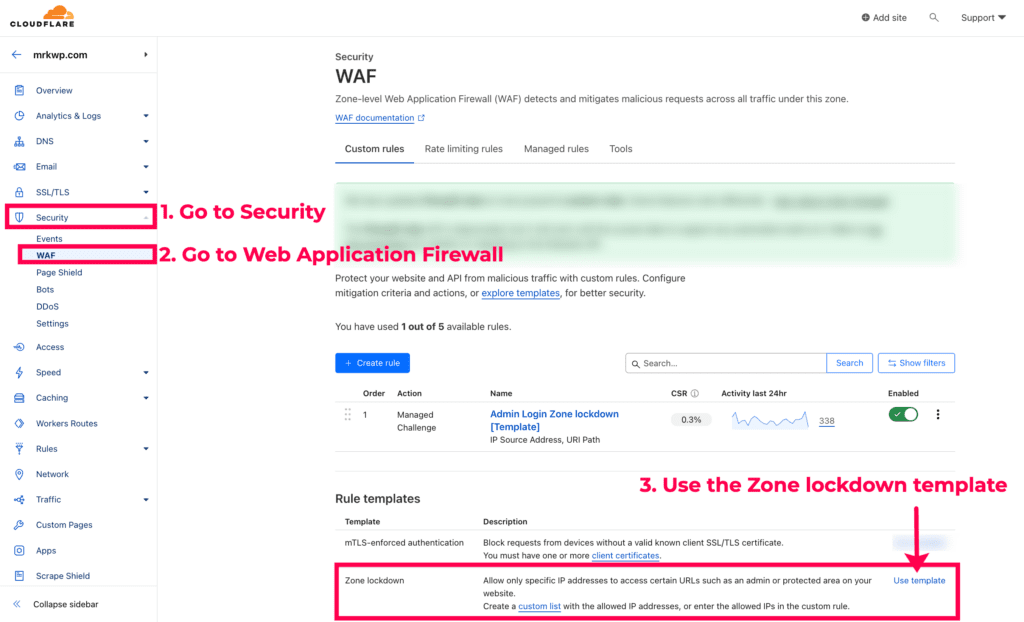
- Navigate to Firewall Settings: Go to the “Security” section in the Cloudflare website settings.
- Proceed to WAF: Under the security dropdown, select “WAF (Web Application Firewall).”
- Select Firewall Rule Template: Within the WAF settings, find the Rules Templates section and select the Zone lockdown template.
Define the WordPress Login Lockdown Cloudflare Rule
Now, you will set up a rule to block anyone who isn’t on your allowed IP list from reaching your login page. Here is how you can define the web rule.
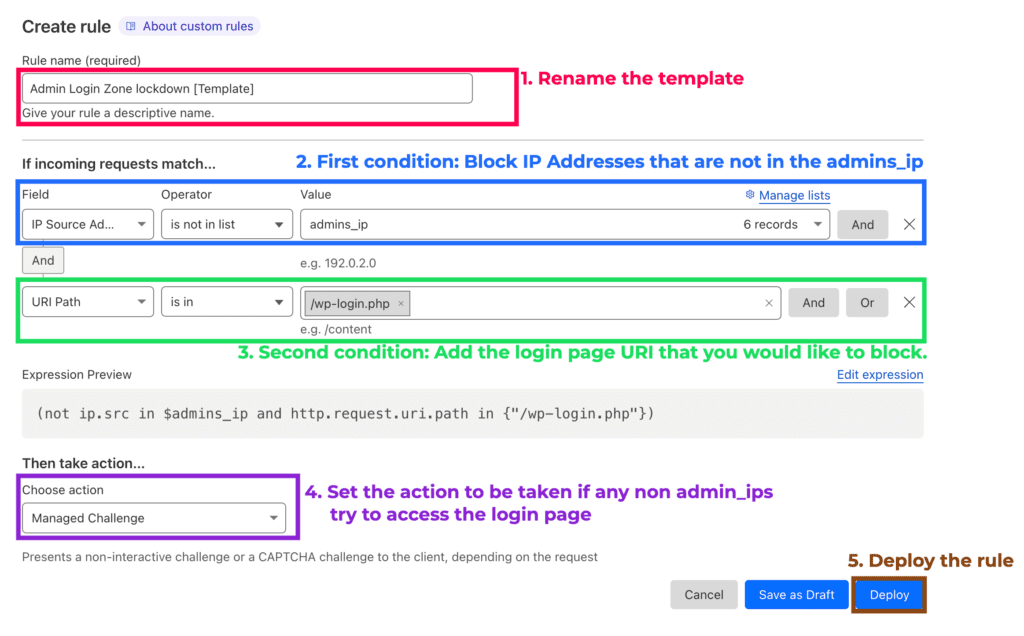
- Rule Name: Rename the rule template with a descriptive name.
- Allowed IP Address: Next, specify which IP addresses can access the login page. Here, we will reference a list of allowed IPs “admin_ip.” We will look into this list later. Hence, this rule basically blocks any IP address that isn’t on your “admins_ip” list.
- URI Path for Login Page: In the “URI path” field, enter
/wp-login.php. This targets the specific path of your WordPress login page. We tell the rule to only block access to the login page (/wp-login.php) for visitors not on your allowed list. - Action: From the “Action” dropdown menu, choose “Block.” This action denies access to the login page for unauthorized IP addresses. You can also choose other actions such as Managed Challenge, JS Challenge, Interactive Challenge, etc.
- Deployment: Click the Deploy button to implement the web rule.
Caution
Avoid blocking /wp-admin: Don’t restrict access to the /wp-admin folder when setting up IP restrictions. This path holds important files for your site needs to work right.
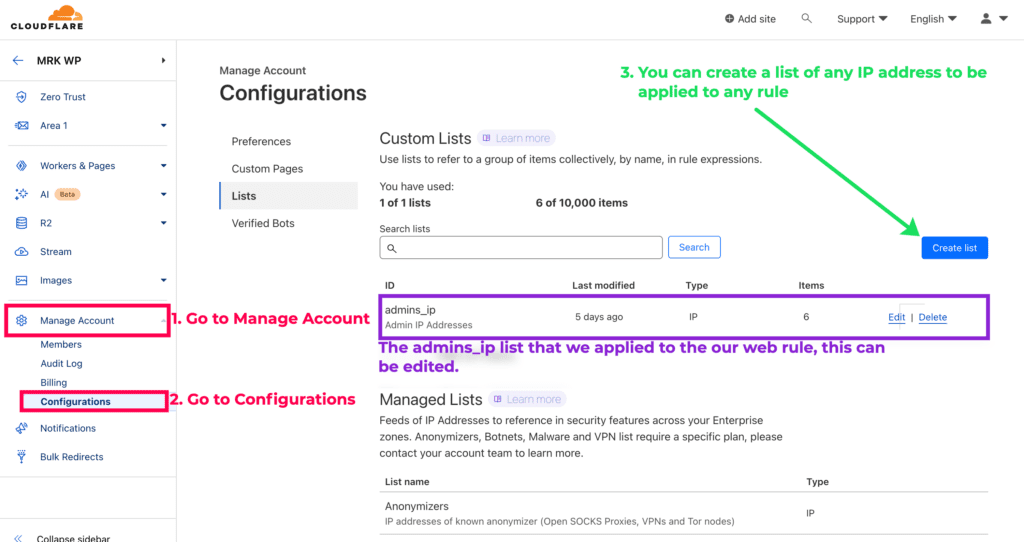
Allowed IP Addresses List
In previous steps, we mentioned an “admin_ip list.” This is where you add the IP addresses you want to allow access to the login page.
You can create lists like allowed IPs inside Cloudflare and use them for different security settings. To access this feature,
- Go to your website Cloudflare settings.
- Via the sidebar menu, go to Manage Account.
- Under the Manage Account submenu, proceed to Configurations.
- In the “Configurations” area, you can create or edit your custom list IP address lists.
Test Your Rule
Once you’ve saved the rule, try accessing the wp-login.php page.
- Success: If you use an IP address you listed as allowed, you should be able to access the login page normally.
- Blocked: If you try logging in with a different IP address (not on your list), you should not access the login page.
Conclusion
Keeping your WordPress login safe is the most important thing to stop hackers from getting in and messing with your site.
Follow these steps to lock down your WordPress login! This will prevent random IP addresses from accessing your website’s login page.
Frequently Asked Questions
u003cstrongu003eu003cstrongu003eWhy is it important to restrict access to my WordPress login?u003c/strongu003eu003c/strongu003e
Your WordPress login page is a prime target for attackers. Locking down your website login with allowed IP addresses keeps hackers out!
u003cstrongu003eDo I need a paid Cloudflare plan to lock down my login page?u003c/strongu003e
No, you do not need to upgrade for this security feature. Restricting access by IP address is included in the free Cloudflare plan!
u003cstrongu003eu003cstrongu003eHow can I locate my IP address?u003c/strongu003eu003c/strongu003e
Many websites can tell you your current IP address. A simple search for u0022my IP addressu0022 will do the trick.
u003cstrongu003eWill locking down my login page break my website?u003c/strongu003e
No, this only stops unauthorized attempts to your login page. All other pages will remain accessible to everyone. Remember to test the rule thoroughly after deploying it on your live site.
My host provides enterprise cloudflare, Do i need to implement this?
In my experience enterprise cloudflare provided by a host will not let you apply these kinds of rules. I have tested this with WP Engine and Cloudways, both did not let me apply any custom rules. You get what the host deems is best for your website.u003cbru003eDepending on your use case, this will either be perfectly fine or it will cause a huge problem. If you need help with this get in touch with our team.